Introduction
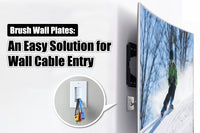
Are you tired of loose, messy wires hanging behind your desk or TV? Stay with us, and discover how a plate can keep everything tidy, safer, easier to service, and reliably functioning.
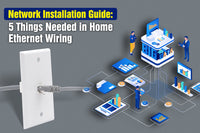
In this Ethernet and HDMI installation guide, you’ll see how to choose the right plates, understand the components hidden in the wall, and install your plates without ruining your drywall. The goal is to have clean, labeled ports, right where you need them, and with reliable links back to your equipment.
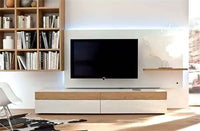
Imagine a living room with one TV, a console, and a streaming box. You can install a single combined wall plate that includes both an Ethernet wall plate jack and an HDMI wall plate port, or two separate plates side by side to get a cleaner, organized setup. This will also make future changes or upgrades much easier than having to deal with loose cables hanging down.
The wall-mounted plates are small panels installed on the wall, used to orderly arrange low-voltage cables such as Ethernet and HDMI. What is mentioned here is not the power socket you use to connect the TV, but the interface panels specifically designed for network and audio-video signals, making the connection of your devices neater and more efficient.
Imagine a living room with just one TV, a gaming console, and a streaming box. You can choose to install a single combined wall plate that includes both an Ethernet keystone jack and an HDMI port, or opt for two separate plates placed side by side—either way, you’ll enjoy a cleaner, more organized setup. This thoughtful approach not only looks better but also makes future upgrades or adjustments much easier, saving you the hassle of dealing with tangled or dangling cables.
Expert tip: Plan your plates location so as to keep the total channel length (including patch cords at both ends) under 100 m / 328 ft. For safety, limit the in-wall (permanent) run to 90 m.
Types of Wall Plates
Ethernet wall plates: For RJ45 (Cat6/Cat6a) cables
The front of an Ethernet wall plate usually has one or more RJ45 interfaces, which are ingeniously hidden inside the wall. They achieve stable connections through the network cables running throughout your home. You can choose single-port, dual-port or multi-port models as per your needs, flexibly meeting different usage scenarios. Many wall plates adopt modular design and are equipped with plug-and-play bases - simply plug the network cable into the base, and press it gently to install it on the panel. This design is not only simple and elegant but also makes it more convenient for you to replace or adjust the interface in the future, without the need to replace the entire wall plate, which is both convenient and efficient.
For a basic Ethernet wall plate installation, most homes stick to one or two data ports close to each desk, TV, or home office space.
- A Cat6 wall plate, which is a wall plate designed for Cat6 Ethernet cables, can handle gigabit traffic and is sufficient for many rooms.
- A Cat6a wall plate gives more headroom for 10G links and better noise performance on longer runs. It is more suitable for use in scenarios such as factories or offices where there are higher network requirements.
If you already know how to wire an Ethernet wall plate, you can upgrade your older Cat5e jacks by pulling the new cable to the same location and swapping jacks without changing the room’s layout. If you don’t, keep reading and learn how to.
HDMI wall plates: For video and audio connections
HDMI wall plates are a clever solution to hide HDMI cables behind the wall, making your space neater and visually fresher. They are responsible for smoothly connecting display devices (like TVs) with signal source devices (like Blu-ray players) to achieve high-quality audio and video transmission. Many plates are equipped with short HDMI tail cables on the back for convenient and quick connection. There are also designs that adopt male-to-male HDMI lattice heads or connectors, providing more flexible installation options. No matter which type you prefer, we recommend that you ensure the HDMI cables and connectors you use comply with local building codes, are specifically designed for low-voltage environments within walls, and are safe, reliable and reassuring.
If you want stable 4K video or gaming, opt for a 4K HDMI wall plate that works with certified High Speed or Ultra High Speed HDMI cables. The HDMI keystone wall plate model lets you mix HDMI, Ethernet, and other keystone modules in the same frame.
For long video paths, pair the plate with a cable that meets the Ultra High Speed HDMI program so it can handle 4K/8K signals and reduced electromagnetic interference (EMI) around your Wi-Fi gear.
Knowing how to install an HDMI wall plate correctly involves using an in-wall-rated HDMI cable (for example, labeled CL2 or CL3) that meets the safety and fire requirements in your local electrical code for low-voltage concealed installations. It also requires avoiding tight bends, and testing the picture quality before closing everything up.
Combination wall plates: Ethernet + HDMI + coaxial or USB ports
The combo plate can ingeniously integrate multiple connectors within a single framework, making the wiring more concise and usage more efficient. For instance, you can opt for a wall plate that incorporates Ethernet, HDMI, and coaxial interfaces, easily supporting the connection of streaming media, games, and cable or satellite TV signals. This design is particularly suitable for the complex connection requirements behind televisions, not only saving space but also allowing your devices to be connected in an orderly manner, enabling you to enjoy a smoother entertainment experience.
If you only need a couple of connections, you can put a combo plate in single gang wall plate opening. Or you can opt for a double-gang frame if you want extra ports. Single-gang openings are meant for one device, while 2-gang plates hold two devices, which are side-by-side, in a wider opening.
Expert tip: When you design a media wall, leave at least one extra low-voltage port in each faceplate. This additional opening will save you from having to do another installation later if you want to add a new device.
Components
Behind a neat faceplate, there’s a small system of brackets, cables, and connectors.
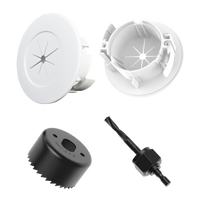
Low-voltage mounting hardware
The majority of data plates sit in a low-voltage mounting bracket, not in a full electrical box. These brackets fasten to drywall and give you threaded holes for the plate screws. They also leave plenty of space for the low-voltage cable behind.
You can get single-gang and double-gang versions to match your wall plate size. For new walls, you can use standard low-voltage boxes. For existing drywall, “old work” brackets are designed to clamp in place from the front.
Cabling and connectors
When it comes to data, your plate will host twisted-pair cable and jacks:
- In modern homes and overall installations, the use of Cat6 or Cat6a cables is common, although many older homes still have Cat5e. A Cat6 wall plate or a Cat6a wall plate is simply a plate that supports the matching keystone or fixed jack.
- A keystone jack wall plate has snap-in keystone modules that you punch down once. Then you can reuse the faceplate frame if you change the jack styles.
Inside the keystone, you’ll follow a pin-out standard. The two common options, T568A and T568B, define the color-pair order on the RJ45. T568A and T568B are both acceptable per TIA-568.2-D. The key is to keep the same wiring scheme on both ends of a link.
For HDMI, the plate connects to the in-wall HDMI cable. This cable should be rated for in-wall use (CL2, CL3, or similar). This rating indicates that a jacket meets fire-safety rules for concealed spaces.
Tools and accessories
With a modest toolkit, even a beginner can handle basic plate work. Here’s what’s needed for a wall plate installation:
- A punch down tool and a cable stripper for RJ45 wall plate wiring
- A screwdriver
- A drywall saw
- Tape measure and a level
- A basic RJ45 cable tester to verify the eight conductors and pair mapping
- Labels
These tools make it easy to repeat the same installation across several rooms.
Installation Steps
This section of the Ethernet and HDMI installation guide covers every step of the process, from planning to testing. Remember to keep low-voltage cables far from high-power lines unless you use boxes with approved dividers and follow local codes.
1- Plan the wall plates locations
Walk through every room and decide where you want the plates. For example, consider placing them behind the TV, near desks or gaming consoles, or in areas where you’ll eventually install an access point, switch, or media cabinet.
Mark the wall at a comfortable height. In TV areas, it’s usual to find the plate right behind the screen. Another widespread choice is placing the plate at the same height as the power outlet, in parallel.
Look for studs and avoid them. And if you’re unsure what’s inside the wall (like pipes or cables), make a small test opening before cutting the total shape.
2- Cut and prepare the openings
Hold the low-voltage mounting bracket against the wall and trace its shape with a marker. Cut the hole a bit inside the line so the bracket can grip the drywall when you tighten the screws.
Remove the cutout piece and check the cavity. If you find power cables, keep your low-voltage bracket at least a few inches away or use a separate stud bay. Then just insert the bracket and tighten it.
3- Run and terminate the Ethernet cable
Run a Cat6 or Cat6a cable from your central point to each wall plate. Make sure to keep bends gentle and don’t pull too hard; you won’t want the jacket to stretch.
At the plate end:
- Strip just sufficient outer jacket to reach the keystone.
- Untwist each pair as little as possible.
- Follow the color wiring scheme you selected (for example, T568B).
This is the core of RJ45 wall plate wiring. When you push each conductor into the keystone slots using the punch down tool, you’re building a jack that will stay in that plate for years to come.
Now, repeat the termination on the other end of the run (second jack or patch panel). Then test all links with a network tester to verify that the eight conductors are correctly connected.
Once you learn how to wire an Ethernet wall plate, expanding the network later becomes much easier since every plate follows the same logic.
4- Install and connect the HDMI wall plate
The next stage is to deal with the HDMI. Proceed as follows:
- Measure the path from the TV to the location of your media cabinet, AVR, or console.
- Choose an in-wall HDMI cable that is long enough to cover the run and leave a bit of extra slack.
- Check if the jacket is marked as CL2, CL3, or similar in-wall rating.
On the back of the HDMI wall plate, connect the in-wall cable to the captive pigtail or to a listed HDMI keystone/coupler. Avoid hiding loose, non-listed couplers in the wall cavity. Now, on the TV, use a short patch cable between the wall plate and the HDMI input. At the device or rack, connect the other side to your source.
If you install a 4K HDMI wall plate, use Premium High Speed HDMI cables for 4K at 60 and HDR or Ultra High Speed HDMI cables to support 4K high-refresh or 8K. To check the authenticity of Ultra High Speed cables, scan the QR label, as described on the Ultra High Speed HDMI certification page.
5- Mount, label, and test all
Once you have finished with all terminations, you need to:
- Mount the plate on the bracket and tighten the screws.
- Label all Ethernet ports with a simple code (for example, Office-1, LR2) matching the notes at the central panel.
- Route the cables inside the panel and secure them with Velcro ties.
- To test the network ports, connect a laptop and check the speed and stability.
- To test HDMI, play a video, and watch for flicker, random blackouts, or sparkles.
Common Mistakes to Avoid
The common mistakes you should avoid can be classified into three main categories: Ethernet wiring errors, HDMI and device issues, and planning and labeling gaps.
1- Ethernet wiring errors
Some small wiring mistakes can stop a connection from working or reduce its speed. The most frequent ones are:
- Mixing T568A on one end and T568B on the other end of the same cable
- Untwisting the pairs too close to the jack
- Bending the cable too sharply (below its minimum bend radius) or stapling it (which can crush conductors).
- Running Ethernet in parallel and too close to mains power over long distances
2- HDMI and device issues
When it comes to HDMI, the most common problems come from cable quality and length. Low-grade cables can convey 1080p properly, but fail at 4K, particularly with HDR or high frame rates. Likewise, long passive cables lose signal faster.
Avoid that by:
- Using in-wall rated HDMI for hidden runs
- Keep runs within the cable manufacturer’s recommended length
- Consider using active or fiber HDMI for long runs
3- Planning and labeling gaps
It’s common to forget documenting the layout of the project and to skip labeling all the cables. Later on, if you need to fix something or make changes, you don’t know where each port goes.
Save yourself a headache by:
- Labeling both ends of all Ethernet cables
- Adding a sticker close to the central panel, noting the room and plate number
- Taking photos (before closing the wall) that show where cables run
Conclusion
Planning your wall plates carefully makes it easier to manage your network. If you choose the proper brackets, jacks, and cables, and document it all, what is a bundle of wires becomes a clear grid of ports. And you, or anyone in the house, will be able to understand it at a glance.
With this Ethernet and HDMI installation guide, now you know how to:
- Pick Ethernet only, HDMI only, or combo plates
- Use a low-voltage mounting bracket and keystones
- Handle RJ45 wall plate wiring with a consistent pattern (T568A vs T568B)
- Select in-wall HDMI
- Test your runs before closing the wall
Once you’ve done an installation in one room, you’ll be surprised at how easy it is to repeat the same steps in the rest of the house. Use your notes, label everything, and your wiring will go from “temporary fixes” to a permanent layout that supports your devices without problems.


This is a really helpful and well-structured guide for anyone planning in-wall Ethernet and HDMI installations. I especially appreciate how clearly you explained the difference between choosing separate vs. combo wall plates and the importance of proper planning before cutting into drywall. The step-by-step installation breakdown makes what can feel like a complicated process much more approachable, even for beginners. The emphasis on testing connections and avoiding common mistakes like poor labeling or incorrect wiring standards is also very valuable for long-term reliability. Overall, this is a great reference that combines practical advice with real-world best practices for clean and professional-looking setups.