Cat6 Ethernet cables are popular in residential and commercial network wiring, providing stable and reliable network connectivity. It is known that Ethernet cable termination should adhere to the A or B wiring diagram, as does Cat6 cable termination. This article provides an in-depth explanation of the Cat6 wiring diagram, covering how to terminate Cat6 cables with additional tips and guidelines.
What is Cat6 Cable?
Category 6, released by the Telecommunications Industry Association (TIA) in 2002, is a high-performance standard twisted pair cable used in Ethernet or other network physical layers. Cat6 cables are widely used in LAN and WAN applications and are often used to connect computers to routers, switches, printers, scanners, hubs, and other devices. A typical unshielded Cat6 cable contains four twisted pairs, a rip cord, and a spline separating the twisted pairs to reduce crosstalk. There are also shielded Cat6 cables on the market with additional shielding layers to prevent EMI and RFI.
Cat6 cables can also be divided into different types based on various features. For example, there are solid and stranded Cat6 cables based on different copper wires. Based on different cable jacket ratings, Cat6 Ethernet cables can be classified into CM (general), CMR (riser-rated), and CMP (plenum-rated) cables. Cat6 performs better than previous categories of cables like Cat5e and Cat5 as it supports higher bandwidth and data transfer rates.
Cat6 cables are designed to pair with RJ45 connectors. To achieve the maximum network performance of Cat6 cables, Cat6 connectors are recommended. If you use a shielded Cat6 cable, you’d better terminate it with a shielded Cat6 connector. But Cat6 cables are also backward compatible with Cat5 and Cat5e connectors.
Cat6 Wiring Diagram
A Cat6 wiring diagram illustrates the sequence in which the wires are arranged when terminating Cat6 cables. Following the Cat6 cable diagram correctly prevents compatibility issues.
There are two wiring standards for Category 6 cables, one is T568A and the other is T568B. Their distinction lies in the reversed position of the green and the orange wire pairs. In most cases, these two Cat6 wiring color codes do not make any difference, and you only need to choose either according to personal preference and stick to it. In real life, the T568B wiring diagram is more popular for Cat6 cable termination.
Another factor you should notice about the Cat6 wiring diagram is the color sequence on both ends of the cable. The same wiring diagram should be followed on both ends of the cable throughout the network installation. If you use T568A on one end of the cable and T568B on the other, you will create a crossover cable, which is used for specific network purposes.

How to Choose Cat6 Wiring Diagram?
- ANSI/TIA previously recommended the T568A for residential installations because it is backward compatible with older technologies such as fax machines and wireless telephones. If you want to connect Cat6 cables with the old devices, you can select the T568A wiring standard.
- Most modern network equipment uses the T568B color code.
- If the cable is already installed, check the existing wiring standard and maintain consistency by using the same wiring diagram.
- Crossover cables used to be employed to connect two identical devices. But today most devices adopt new technology to detect wire pairs, and you can use straight-through cables with the same wiring diagram at both ends almost everywhere.
How to Terminate a Cat6 Cable?
Now that you have already known about the Cat6 wiring diagram. The next thing you should learn is how to correctly terminate a Cat6 Ethernet cable. Here is a step-by-step tutorial for you. In this tutorial, we use the T568B wiring scheme during the cable installation.
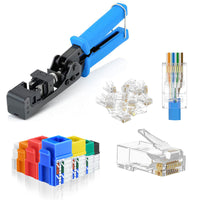
Preparation: Gather all the necessary materials and tools you need for terminating the Cat6 cable.
- Pass-through Cat6 RJ45 connectors: These Cat6 connectors are friendly to beginners as they are easy to install and can help reduce wiring errors.
- Strain relief boots: They are recommended to protect the RJ45 connector and Ethernet cable from dust and damage.
- Pass-thru RJ45 crimping tool: This is one of our hot products used to quickly and easily terminate Ethernet cables.
- Mini wire stripper: With an adjustable stripping blade, this portable stripping tool can cut and strip various cables, such as network, coax, and telephone cables.
- Cable snip: This easy-to-use cable snip is ideal for cutting plastic and 12-46 AWG copper wires.
- Network tester: Suitable for RJ11 and RJ45 cables, this compact network tester can save you time testing cables in Ethernet and telephone cable installations.

Step 1: To start with, slide the strain relief boot through the cable before installing the Cat6 connector and terminating the Cat6 Ethernet cable.

Step 2: Use a mini wire stripper to strip off the cable jacket. Be careful to adjust the blade to avoid damaging the copper wire. Keep the stripped jacket aside for later use.

Step 3: Cut the rip cord and the center spline with the cable snip.

Step 4: Untwist and straighten eight wires using the stripped cable jacket. Make each copper wire as straight as possible.

Step 5: Arrange the wires according to the T568B standard: orange-white, orange, green-white, blue, blue-white, green, brown-white, brown.

Step 6: Cut off the copper wires. Here is the tip: the angled cut can make an easier insertion into the RJ45 connector than the straight cut.
Step 7: Insert the wires into the RJ45 connector.

Step 8: Double-check the wire sequence and install the strain relief boot onto the RJ45 connector.

Step 9: Prepare for the crimping. The small tip is that you can twist the excess wires so they can be easily inserted into the cavity of the crimper.

Step 10: Use the pass-through RJ45 crimper to crimp the RJ45 connector. Meanwhile, the excess wires will be cut.

Step 11: Repeat the above steps on the other end of the cable. Use the same Cat6 wiring diagram.

Step 12: Don’t forget the last step. Use the network tester to check whether the Cat6 Ethernet can work well.

Common Issues of Cat6 Wiring
Cat6 cable termination may not always be successful, especially for novices. For example, the contact pins may not be in contact with the conductor, or the wire sequence is incorrect. In these cases, you should replace the Cat6 connector and re-terminate the cable.
If you need to terminate your Ethernet cable in the field, field termination plugs are recommended because they can be used multiple times.
If you are going to install network cables in environments full of interference, consider using shielded cables and connectors. Use quality cables and connectors, terminate correctly, and run cables within 100 meters, then you will be satisfied with your network performance.
Conclusion
Cat6 wiring diagrams are indispensable in Ethernet cable wiring. Cat6 cables are the most recommended category for home and office networks. Mastering the knowledge of Cat6 wiring helps you quickly make a Cat6 patch cable, even if you are a beginner to cable termination.
FAQs
Does a Cat6 cable use all eight wires?
Cat6 cables are designed for Gigabit Ethernet. Unless they backward adapt themselves to older Ethernet standards, Cat6 cables use all eight wires: Pairs 1 and 2 for data transmitting and receiving separately, pairs 3 and 4 for additional data transmission and PoE applications.
Can I run Cat6 cables in the same conduit as electrical wires?
Cat6 cables can run in parallel with low-voltage cables, while unshielded Cat6 cables should be kept at least 30 cm away from power lines to avoid EMI. Do not run Cat6 cables and electric wires in the same conduit unless there are sufficient barriers to separate them.
What are the consequences of incorrectly wiring a Cat6 cable?
Incorrect wiring of Cat6 cables may lead to network failure, slow network speed, or transmission errors.
For more information on this topic, you can keep up on our blogs. While VCELINK offers general and basic information for our customers and other visitors to the website, it’s not professional advice.


I need cat6 and HDMI Crimping tools, RJ45 and HDMI terminals.
Which one is DC+, Dc-, Data+ data- and other functions of the 8 wires of cat 6