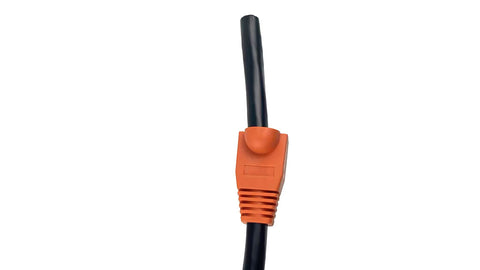
An Ethernet cable can be terminated with RJ45 connectors, keystone jacks, or field termination plugs, but RJ45 connectors are the most common type. If you shop in a store online or offline, you may find a short network cable that has RJ45 (8P8C) connector on both ends, and that’s a patch cable. People often buy a patch cable to plug into the port of a router or computer. But why not DIY a patch cable yourself?
Terminating a CAT5E or CAT6 cable is very easy, especially for those who love installing home or small office networks. This post will teach you everything about terminating Ethernet cables with RJ45 connectors, including termination tips and common mistakes. Let’s make a perfect CAT6 cable like a pro!
About Copper Network Cable and RJ45 Connector
What are copper network cables and RJ45 connectors? Copper network cables usually feature eight copper wires twisted into four pairs. There are different Ethernet cable categories such as CAT5E, CAT6, and CAT8 cables. CAT6 cables can handle 10Gbps speed in short distances and are cost-effective to upgrade, so they are favored by many users nowadays. You’d better give Ethernet Cable 101 a read for a better understanding.
RJ45 connectors refer to “8P8C modular plugs”, and they are often used to be plugged into the router and computer for network connection. Know more about this tiny plug in RJ45 Connector 101.
Step-by-Step Guide: How to Terminate CAT6 cable?
Before terminating the CAT6 cable, here are some facts that you should know:
- A Cat6 cable from one manufacturer is not always compatible with a Cat6 connector from another manufacturer.
- In fact, the “Cable Category” does not matter on the market. The most important thing is whether your cable diameter fits the connector or keystone.
- ProfessionalEthernet cable tools are necessary for cable termination for quick and easy operation.
- Pass-thru RJ45 connectors are more recommended for novices as they are easier to operate than other standard RJ45 connectors.
Step 1: Materials and Tools Needed
Required materials and tools:

- Bulk CAT6 cable (U/UTP)
- Pass-thru RJ45 connector
- Strain relief boot
- Flush cutter (or even scissors)
- Cable stripping tool
- CAT6 crimping tool
If you have an RJ45 crimping tool with a built-in adjustable stripping tool, you don’t require an extra stripping tool for the CAT6 cable. But please note that this crimping tool cannot strip CAT5 or CAT5E cables. You can also replace the flush cutter with a pair of common scissors.
Step 2: Do You Prefer T568A or T568B?
The next thing you should consider is the RJ45 wiring diagram. T568A or T568B is no better than each other, it doesn’t matter which one you choose. The only thing you should remember is that once you pick one RJ45 wiring diagram, stick with it. Many users prefer to use T568B wiring diagram and this tutorial will also use the T568B standard. If you want to read more about these two RJ45 wiring diagrams, read on T568A vs. T568B.

Step 3: Install the Boot
Prepare all materials and tools and choose the RJ45 wiring diagram; let’s get down to the installation. Before stripping and cutting cables, you should install the strain relief boot on the cable. This step is essential, or you’ll have to restart all steps.
Step 4: Strip the Cable
You can strip the CAT6 cable with a CAT6 crimping or professional stripping tool. Measure 1 inch of the cable and strip off two circles of the Ethernet cable jacket. Remember that you’re not going to cut the cable jacket but strip it. Be careful not to damage the inner conductor. Strip the cable jacket and then cut off the rip cord and center spline.


Step 5: Insert Cable Wires
After stripping the cable jacket:
- Don’t throw it. It helps a lot to separate conductor pairs.
- Make eight cable wires as straight as possible because it may affect your network speed.
- Arrange eight wires into the T568B wiring diagram and then use the flush cut to give them an angled cut.
- Insert them into the RJ45 plug.
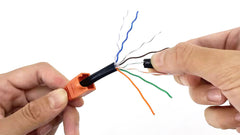


Before crimping, you should make sure that the color sequence is correct.
Tips: You’d better use the side of the plug with strain latch to terminate the Ethernet cable. If you use the opposite side of the plug (side with a retaining latch), you should use a reverse color sequence.
Step 6: Crimp the RJ45 Connector
Place the RJ45 plug into the crimping tool and make sure that the RJ45 plug is correctly seated. Press the crimping tool tightly, and you’ll get one perfect cable end. Do you know why the RJ45 plug should be crimped? It can make contact between prongs and wires and cut off the excess conductor wires simultaneously.


Moreover, it also helps press the strain latch to the cable jacket to hold the cable tightly. Don’t forget to put the boot on the RJ45 plug to protect it from dust and water.
Step 7: Don’t Forget the Final Step
Remember to test whether the patch cable can work well when you have terminated two ends of the Ethernet cable. There are many types of network testers on the market, and you can choose the most suitable one.


Final Words
Terminating the Ethernet cable can be easy if you have strictly followed the above steps. But if you’re new to this, you should buy enough RJ45 plugs as you may have bad terminations. You’ll get bear fruit if you practice hard.
For more information on this topic, you can keep up on our blogs. While VCELINK offers general and basic information for our customers and other visitors to the website, it’s not professional advice.


Some, more, eazy, methods