You’ve just moved to a new house or office and want to install a new network. You’ve already got a new Ethernet cable and several keystone jacks but found no Ethernet port available in the room. What would you do at this time? An Ethernet port is necessary for an Internet connection; and all you need is an Ethernet wall plate.
What is Ethernet Wall Plate Used for?
An Ethernet wall plate, also known as a network wall plate, RJ45 wall plate, or RJ45 faceplate, provides organized and efficient in-wall network connections in residential and commercial buildings. They serve as an interface through which Ethernet cables and other data cables are connected to devices. These RJ45 faceplates are easy to install, suitable for different scenarios, including living rooms, home offices, gaming rooms, conference rooms, etc. Ethernet wall plates are often paired with mounting brackets to make it be securely affixed to the wall.
Types of Ethernet Wall Plates
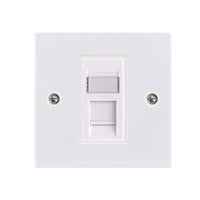
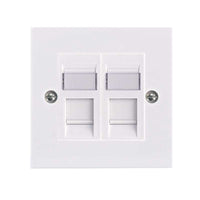
Ethernet wall plates are available in different types. They feature different configurations such as single port, double ports, one gang, and two gangs.
The “port” usually refers to the number of sockets in an Ethernet wall plate. Some people may be confused about the meaning of “gang” when discussing the Ethernet wall plate. In fact, “gang” has different meanings in different countries and regions. It means the physical size of a wall plate in the US and one gang wall plate is wide enough to accommodate a switch. While in the UK, “gang” has a different meaning, and it refers to the number of circuits or switches within a single plate.

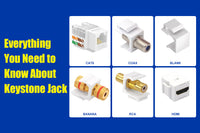
There are also Ethernet wall plates with combination ports on the market. If you want to get both HDMI and Ethernet ports, you can buy an HDMI Ethernet wall plate; if you’re going to get coax and Ethernet connection at the same time, just pick a coax and Ethernet wall plate.
How to Run Ethernet Cable Through Wall?
Plan Before Everything
Before installing the Ethernet wall plate, you should consider the following factors:
- Plan the cable route: It’s known that the maximum distance of a gigabit Ethernet cable is 100 meters (328 feet), so you need to cautiously plan the cable running route. Measure the distance from where the Ethernet cable comes out of the wall from one place to another place. In addition, remember not to damage other electric cables and pipes.
- Best location for distribution: The best location for installing an Ethernet wall plate is usually next to the current power outlet. Choose a hidden place that has big space for room aesthetics. Moreover, it’s better to find a place close to network hardware for a better connection.
- Switch off the power: You need to switch off the electrical circuit before installing the Ethernet jack.
- Number of Ethernet wall plate ports: The above content has mentioned that Ethernet wall plates are available in different sizes and configurations. You can choose a 2, 3, or 4-port Ethernet wall plate based on your specific needs. If you require Ethernet and other ports, just choose combination ports.

Gather Materials and Tools


Materials and tools you’ll need also depend on your own needs, but here are some basic materials and tools you should prepare:
- Ethernet keystone jacks or keystone couplers
- Ethernet wall plates: 2 port Ethernet wall plates, 4 port Ethernet wall plates, and 6 port Ethernet wall plates are available according to your needs.
- Low-voltage mounting bracket (optional): The low-voltage mounting bracket is not a must-have accessory, but it provides a stable and structured foundation for the Ethernet wall plate and offers an aesthetic look.
- Drywall saw
- Pencil
- Electric drill
- Screwdriver
- Measuring tool
- Leveling (optional)
Install the Ethernet Wall Plate
Now, everything is OK and let’s begin to install the Ethernet wall plate.
- Measure and Cut
If you choose to use the low-voltage mounting bracket, you may need to mark four holes and draw the outline. Then use the drywall saw to cut a hole. Make sure the hole can correctly fit the bracket.
If you want to install the RJ45 faceplate, you can cut a hole as big as the port. Be careful not to make the hole too big.
- Run the Ethernet Cable Through Wall
Run the Ethernet cable from the distribution place, and the next step is to wire the keystone jack.
- Wire the Keystone Jack or Insert the Keystone Coupler
Once you have passed your Ethernet cable through the wall, you can either use a keystone jack or coupler on the end of one cable. But if you want a permanent link and a professional look, you’d better wire the keystone jack at one end of the cable. How to correctly wire the keystone jack? Keystone jacks are generally labeled with color codes, and you can choose T568A or T568B wiring standards based on your needs.
- Fix the Network Wall Plate on the Wall
After inserting the keystone coupler or keystone jack into the wall plate, use the screwdriver to attach the Ethernet wall plate to the wall or mounting bracket tightly.
- Plug the RJ45 Connector into the Wall Plate
Plug the RJ45 connector into the port, and don’t forget the essential step: test the connection at both ends of your cable using a network cable tester.
Final Thoughts
Ethernet wall plates help conceal your cable within the wall, creating a professional and organized look in various environments. They are also easy to install as long as you follow the right steps.
For more information on this topic, you can keep up on our blogs. While VCELINK offers general and basic information for our customers and other visitors to the website, it’s not professional advice.


Be the first one to comment.
Leave a comment