There are few things more annoying than a leaking tap or dripping faucet. Not only does the drip drip dripping sound irritate you, but the leaking can also cause a lot of water waste. When the faucet begins to leak, you must fix it as quickly as possible, or it will become a big problem. Learning how to fix a dripping faucet can help you save time and money, which is especially favored by DIYers. So, how to effectively stop a frustrating dripping tap?
What Causes a Faucet to Drip?
Faucet leaks are caused by many reasons. And it is essential to identify the specific cause to solve a dripping faucet appropriately. There are some common causes of a dripping tap.
- Too old faucets: All faucets will wear out if used over time, especially those that don’t have daily maintenance.
- Broken washers: Traditional faucets usually feature a rubber washer to seal the valve seat. Friction can make the washer wear out, getstiff, and be broken, leading to leaks.
- Damaged cartridge: Modern faucets often have two handles: one is used for hot water, and the other for cold water. These faucets feature cartridges on each handle to control the flow of the water.
- High water pressure: High water pressure can put stress on the faucet’s component and lead to leaking. If you notice that your bathroom or kitchen faucets are not constantly dripping, the leaking may be caused by extra high water pressure.
- Installation error: An incorrectly installed faucet may not create a tight seal, leading to leaking.
How to Stop a Dripping Tap?
Most people will call professional plumbers to fix the problem when the tap drips. Why not take 15 to 20 minutes to fix the dripping tap yourself? Before fixing the dripping faucet, do the following things firstly:
- Turn the water off
- Remove the tap head
- Take the tap apart to check out the dripping cause
There are some common ways to solve dripping issues.
Some Common Methods to Fix a Dripping Tap
- Replace the tap washer or O-ring: Dripping taps are often caused by worn-out washers and broken O-rings. If you find out that your tap washer is damaged, replace any worn components with new ones to ensure a tight seal. Different kinds of taps have different solutions.
- Tighten loose parts: Sometimes, it can be the loose parts in the tap that cause the leaking. At this time, you may need a wrench to carefully tighten any loose nuts, bolts, or packing nuts. Please note that do not overtighten it, or it can also damage the tap.
- Regular maintenance: Regular maintenance on your tap can help identify and address potential issues before leaking. You can also regularly clean and lubricate the tap’s components to prevent leaking and ensure smooth operation.
Temporary but Quick Methods to Fix Leaking Tap
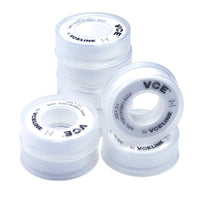
Do you want a simple way to stop the leaking tap and seal the pipe connection? Plumber tapes are your go-to choice. But it is a temporary solution and can only work well on joint pipe leaking. Teflon tape is easy to use even if you don’t have any experience. All you need is a PTFE thread seal tape.

What is Teflon Tape Used for?
Teflon tapes, also known as thread seal tapes, PTFE tapes, and plumber’s tapes, are commonly used to seal pipe threads. Teflon tapes are available in various widths on the market, making them easy to wind around different pipe threads. The plumber’s tapes help protect the pipe threads from direct touch with each other and prevent joint connection leaking. If you find it difficult to replace the washer, maybe Teflon tape is your must-have item for temporary use, and you can call for a plumber later.
How to Use Teflon Tape?
To repair a leaking pipe joint, you need to follow the following steps:
- Turn Off the Water: Before everything, you need to turn off the water. You can close the water supply to the tap, and the valve is often located beneath the sink or wherever the tap is connected.
- Unscrew the pipe joint: You need to remove the tap handle and other components according to different types of taps. You can use a screwdriver or wrench to carefully disassemble the tap to make access to the leaking joint.
- Clean the Threads: Use a clean cloth or all-purpose cleaner to wipe the joint up. Remove the dirt and debris on the threaded areas for smooth operation.
- Wrap PTFE Tape: Use the PTFE tape to wrap around the threaded area in the same direction. Wrapping the plumber’s tape in the wrong direction can damage the faucet. Remember not to overtighten it, and generally, 2-3 wraps are enough to cover the threaded parts.
- Smooth the Tape: After wrapping the tape, use your fingers to gently smooth it down and press it into the threads to ensure a tight seal.
- Reassemble the Tap: Once you have applied the PTFE tape, carefully reassemble the tap by reversing the disassembly steps. Make sure all components are correctly aligned and tightened.
- Turn On the Water Supply: With the tap reassembled, turn the water supply back on. Gradually open the tap and check for any leaks. If the PTFE tape has been applied correctly, it should create a watertight seal and stop the dripping.
Final Words
It would help if you solved a dripping faucet as soon as possible to avoid the larger problem, and a PTFE tape is a good temporary solution. A versatile Teflon tape can be used for various lines such as water lines, gas lines, and oxygen lines.
For more information on this topic, you can keep up on our blogs. While VCELINK offers general and basic information for our customers and other visitors to the website, it’s not professional advice.


Be the first one to comment.
Leave a comment