Introduction
Open the door of a busy network rack, and you may see patch cords directly hanging in front of the switch, gaps between devices, and hot air flowing around. Such wiring not only affects the appearance but may also slow down the speed of daily maintenance or adjustment and weaken the cooling efficiency. At this point, you need the Brush Patch Panel. Although it is small, it can play a big role and help you effectively organize the cables, making the front part of the rack neater and more orderly.
In simple words, a brush patch panel is a metal bar with a dense strip of nylon bristles designed to offer an organized cable entry point in your cabinet or rack and maintain airflow.
Incorporate a brush patch panel between your active gear and cable entry point and enjoy a tidier network rack cable management, improved airflow, and less dust inside your cabinet.
What is a Brush Patch Panel?
In plain language, a brush patch panel resembles a “curtain” for cables. The frame bolts into the rack like any other pane, and the center is filled with flexible nylon bristles. Network or power cables slide through the bristles so you can neatly route them without leaving a big open hole in the rack.
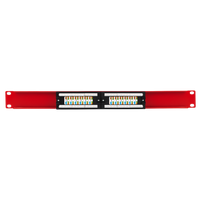
Unlike a standard RJ45 patch panel, a brush patch panel does not terminate cables. It doesn’t have jacks or punch-down blocks. It simply lets bundles pass through, keeps the front looking tidy and reduces the size of the opening gap, reducing bypass air.
Common brush panel sizes and rack mounting options
In most racks, you’ll see a 1U brush panel because it aligns nicely with switches and standard patch panels. In taller cabinets or compact builds, a 2U brush panel provides a larger opening, allowing thicker cable bundles to pass through without being squeezed. Both 1U and 2U types come as 19-inch brush panel units sized to match the width of standard racks, including those that follow the EIA-/ANSI-EIA310 (the classic 19” rack mounting standard originally published by the Electronic Industries Association).
But what does “U” mean? “U”, or rack unit, refers to the height of equipment designed to fit in a 19” wide rack. Racks can allocate equipment that’s 19” wide and of variable heights expressed in “U”. One rack unit (1U) is 1.75”, 4.45 cm tall. A 2U brush patch panel (3.5” or 8.9cm) gives more space for dense bundles, pre-terminated trunks, or multiple cable groups.
You’ll also see the terms rack mount brush panel models and rack mount brush strip cable management panels. Horizontal rack mount brush panel describes the orientation (horizontal), its purpose (cable management) and the mounting location. Brush panel is a general, not-so-descriptive term.
How a brush panel works in a rack
If a rack has no front sealing, the cold air from the room can blow through the devices, but also leak through open gaps. The hot air from the back of the rack can recirculate to the front through any unused spaces below or above your equipment. Adding a cable pass-through brush patch panel in those spaces helps to reduce bypass while still letting cables pass through. The bristles fill the gap enough to slow the airflow while still letting your cables pass through.
As a result, the cables come out as a neat band, and the air follows a more predictable front-to-back route. Keeping switch inlets within the recommended temperature range becomes easier.
Benefits of Using a Brush Patch Panel
A brush patch panel or brush strip panel is the professional, tidy, and protective solution for routing several cables through racks and enclosures. It brings several benefits:
1. Cleaner and easier cable management
The first and most obvious difference you’ll notice after adding a brush patch panel is how much cleaner the front of the rack looks. No more cords randomly sagging across switches. Instead, you’ll have groups of cables exiting through the brushes and dropping into a rack cable management panel.
Since the opening is clearly defined, it’s easier to separate the bundles by function: user ports on one side, uplinks on another, PoE lines in a separate bundle.
2. Improved airflow and cooling
Airflow is one of the main reasons why people use rack cable management hardware. When cables block intakes or when there are open front spaces, the equipment can draw in warmer air, eventually forcing cooling units to work harder. With proper cable routing plus brush patch panels (that reduce those front gaps), the cold air travels through device intakes instead of bypassing the equipment.
Following standard best practices, many technicians recommend sealing unused rack units with blanking or airflow panels to improve airflow within the network rack and prevent mixing of warm and cool air streams. A brush patch panel follows the same reasoning, but leaves space for cable bundles.
3. Dust control and rack protection
Dust usually finds its way into cabinets, especially when there’s foot traffic, open ceilings, or a nearby workshop. Over time, that debris can accumulate on fans, filters, and boards. Brush strips are like small barriers against it, making dust reduction one of the most appreciated benefits of brush panels.
Tip: Use a brush patch panel along with solid doors, filters, and side panels to dramatically reduce dust in rack spaces.
4. Faster troubleshooting and changes
When you have to troubleshoot something, like a failing port or link, the last thing you want is to dig through a mess of tangled cords. Clearly defined routing through brush openings, combined with proper labeling and color coding, makes tracing a cable an easy task. Structured cabling and documentation reduce troubleshooting time and help to avoid mistakes, particularly during emergency work, troubleshooting, and cabling changes (moves or adds).
How to Install a Brush Patch Panel
Plan your rack layout first
Make a simple sketch of your rack, noting where patch panes, switches, routers, and PDUs are, then decide where cable bundles will enter and exit.
Basic tools and steps for installation
You’ll only need basic mounting hardware (it depends on your rack):
- Threaded rails or cage nuts (for square hole rails)
- Mounting screws
- A screwdriver or nut driver
Basic installation steps:
- Choose the rack unit position (and verify the doors still close).
- Install cage nuts if your rails require them.
- Hold the brush patch panel in place and secure it with the four screws.
- Insert the cables through the bristles.
- Guide the cables into your cable management panel or vertical manager.
Cable routing through the brushes: best practices
- Avoid pulling thick cables; push a few cables at a time so the bristles open just as much as needed.
- Keep bends gentle (respect cables’ bend radius).
- Separate power and data cables when possible (to reduce interference).
- If you’re feeding pre-terminated trunks into a 1U brush panel, check if the connectors clear the opening comfortably. (If they rub excessively, consider using a 2U brush panel).
Maintenance checks
- Every few months, verify if the brush patch panel is still firmly attached and that the screws haven’t loosened.
- Inspect for damaged or lost bristles and replace the panel if the opening has become too large.
- Control airflow and temperatures. If you notice hot spots on the gear close to the brush, you might have overloaded the pass-through with too many cables. If so, consider spreading lines across an additional horizontal mount brush panel.
Brush Patch Panel vs. Standard Patch Panel
Brush patch panel vs. standard patch panel is not an “either-or” choice. In most racks, people use both.
The main differences are functional:
- A standard patch panel is a passive component of the cabling system: it terminates cables on the back and features ports (keystones or jacks) on the front. A brush patch panel, on the other hand, is just a dressed opening. It merely guides and hides the cables that pass through it; it doesn’t terminate anything.
- Brush panels control where cables appear on the front of the rack, while patch panels provide testing and labeling points.
- Brush patch panels use brushes to cover cable entry and exit points, providing flexibility in terms of the number of cables and for removing, re-routing, adding or swapping cables without punching. Standard patch panels require punching down cable to specific keystone jacks; changing a connection requires re-punching the cable.
Although brush patch panels and standard patch panels together provide an ample solution for cable management, brush panels are merely stamped metal parts with a brush strip generally made of nylon. They are cheaper than a populated patch panel; since they don’t carry any terminations, you can move them up or down the rack whenever your layout changes.
Where to Use a Brush Patch Panel
Brush patch panels are utilized in networking racks and cabinets to manage and route cables between equipment in a neat and organized way. Besides keeping cables well arranged, brush patch panels protect your equipment from dust, which makes them a recommended choice in environments prone to dust exposure.
Usually, brush patch panels are installed between two switches or above a top switch. A common setup is to mount a switch directly under a patch panel and place a brush patch panel above that stack. This way, cable bundles coming from an overhead tray can drop through the bristles and then spread out neatly to the points in a clean, organized curve.
Brush patch panels are typically used in:
- Small office or business racks (like behind reception desks or close to stock areas).
- Home labs and DIY racks. In those setups, extra patch cords quickly clutter the front of your gear. That’s where a brush patch panel creates a clean pass-through for cables going to desks, consoles, or AV equipment, keeping short cabinets easy to service.
- Server rooms, data closets, and MDF (Main Distribution Frame) & IDF (Intermediate Distribution Frame) spaces. In settings with multiple racks, brush panels are frequently placed near the top and bottom of cabinets. They guide overhead entries and bundles across cabinets while keeping cable openings controlled and tidy.
Conclusion
Although a brush patch panel solves several issues at once, it’s an inexpensive (yet very useful) part of a rack. It guides cables through clearly defined openings, supports cable management best practices, and can help airflow behave in a more predictable way by reducing wide-open gaps, especially if paired with adequate blanking and layout. This enables the cooling system to work the way it is meant to.
Regardless of whether you manage a single wall-mount cabinet or a small room full of racks, add at least one brush patch panel close to each major cable entry to keep the front of your gear easy to understand, neat, and easy to maintain.
Combine a brush patch panel with cable management best practices and you won’t waste time looking for a cable for maintenance or upgrades.


Great reminder that quality rack screws really matter for long-term equipment stability.