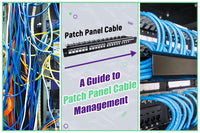
Whether you’re setting up a domestic network, managing s small business, or organizing a data center, wiring the network rack correctly is mandatory. A neat and well-structured rack not only improves network performance but also simplifies maintenance and troubleshooting. If you’re new to wire a server rack, don't worry, we’ll guide you through the process step by step.
What is a Network Rack?
A network rack, also called a server rack, is a structure or framework designed to contain the network equipment (for example, routers, servers, switches, and patch panels). These racks enable you to achieve a proper organization, guarantee your equipment has sufficient cooling, increase security, and make accessing your cables easy when you need to fix any errors or do maintenance tasks. The network racks play an important role in data centers or IDF closets.
Racks can be divided into different types and sizes. Network racks are often 19-inch or 23-inch to meet different demands of equipment management. They often come in standing and wall mounted types for different cable management.
If you don’t like messy cables or hate wasting time tracing where the diverse connections are, a well-structured, wisely planned server rack wiring will make an enormous difference.
Main Functions of a Server Rack
All of these purposes intend to make your network setting stable and efficient.
- Order and organization: It keeps an ordered environment that makes it easy to access and handle the equipment.
- Cooling: Placing the equipment at a considerable distance facilitates allows for better airflow, which prevents the equipment from the harmful excessive heat.
- Safekeeping: Guards essential hardware from unauthorized access.
-
Upkeep and repair tasks: If the rack is well-wired, upkeep and repair tasks will be much simpler.
We could state that the server rack is the spinal cord of your infrastructure; if you ensemble it right, everything will work without avoidable problems.
Step-by-Step Tutorial for Wiring Your Network Rack Correctly
Below, we have made a list of the steps you need to take to wire a network rack as a top pro.
Step 1: Plan Your Rack Layout
Plan before going hands-on. It avoids laborious and exasperating rework (not to mention the unforeseen costs). It also grants that everything is just the right size. Good wiring starts with proper planning:
- Measure the equipment: Measure the size and depth of all devices. This lets you leave good space between them and prevents surprises at the moment of installation.
- Rack size: Go for a rack size that will meet your present as well as future needs. Look for common sizes, between 8U (rack units) and 48U, considering any eventual future expansion.
- Route the cables: Accurately define the direction each cable will follow and verify there are no overlaps or unnecessary extensions.
If you start without a plan, you’ll most likely have to rewire everything later, and you’ll surely won’t want to work twice.
Expert Tip: Leave 20% of rack space empty for future expansions of your network.
Step 2: Select the Proper Network Rack Type and Number
Select the one that best fits your environment and equipment.
Different setups necessitate different types of server racks:
- Two-post racks: These network racks are used to accommodate lighter and shallower equipment, such as patch panels or switches.
- Four-post racks: Suitable for heavier and deeper servers and large setups demanding a lighter level of stability.
- Enclosed cabinets: Perfect when additional protection is needed, such as dust-proofing and controlled airflow features.
- Wall mount racks: Great for restricted spaces such as offices with little floor space available.
Tips for choosing the right number of rack units:
- Count the number of rack units needed;
- Decide horizontally or vertically before cable routing;
- Decide any future growth that you may need in the future;
Choosing the correct rack type saves time and money in the long run, so plan bearing in mind your current and future needs.
Step 3: Utilize the Correct Cable Management Accessories
The correct equipment can turn a jungle of wires into a tidy system that runs better and lasts longer.
Organize the cables so they do not tangle and preserve airflow. For that, you should use diverse cable management tools and accessories:
- Velcro straps: Simple to adjust, reusable, and cable-friendly compared to zip ties.
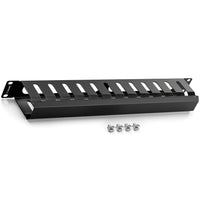
- Horizontal and vertical cable managers: These pathways keep cables organized and aligned, eliminating interference and making maintenance easy.
- Patch panels: Centralized points for simpler management, cable swapping, and troubleshooting.
If the cables are organized and easy to access, you (or the technical team) will appreciate it on every upgrade or repair.
Step 4: Label All Cables
Detailed labeling allows you to fix issues quicker and makes updates less annoying. Besides, organizing your cables clearly minimizes troubleshooting time significantly:
Color coding: Color-code according to cable function (data, voice, and power). Visual differentiation makes it easy to identify them.
Printed labels: Tough labels at or close to the connectors for speedy recognition.
It might be tedious, but labeling the cables is valuable the instant you have to solve an issue and must be able to quickly follow a cable line.
Expert Tip: Maintain a digital or physical cable map. Regularly update it to simplify future maintenance tasks.
Step 5: Route Cables Strategically
Proper routing enhances performance and reduces cable wear and tear. And you’ll want the wiring of your server rack to last long, so don’t overlook this step because good cable routing minimizes interference and enhances performance:
- Isolate data and power cables to prevent electromagnetic interference (EMI), important in ensuring signal integrity.
- Avoid sudden bends and turns, and hold soft curves to avoid internal wiring damage.
- Organize different cables into separate pathways or trays and, thus, reduce the extent of possible interference.
Clean routing not only gives a professional appearance but also prevents loss of signal and physical deterioration over some time.
Expert Tip: Run spare cables when initially installing so you can accommodate future requirements without extensive rework.
Step 6: Manage Airflow and Cooling
Cooling your equipment and properly wiring are equally crucial. Adequate airflow translates to a longer lifespan. Good airflow greatly extends the lifetime of your equipment, so it’s a significant stage if you want to correctly wire your network rack.
- Position heavier equipment, such UPS devices, at the bottom. This provides added stability and facilitates good heat dissipation.
- Fit blanking panels to avoid recirculation of hot air and enhance cooling effectiveness.
- Provide sufficient space between devices for proper ventilation to prevent overheating.
Expert Tip: Monitor temperatures regularly using environmental sensors to avoid unexpected equipment failures.
Usual Mistakes to Avoid When Wiring a Server Rack
Avoiding them will save you time and money and will also prevent network downtime.
Even experienced professionals make mistakes, avoid the following common errors:
Overcrowding: Don’t overload your rack. Crowded racks limit airflow and complicate maintenance.
Overlooking weight limits: Always check the load capacity of your rack to avoid damaging the structure or equipment.
Overlooking maintenance: Periodic checks and repairs maintain your server rack and overall setup in good health.
Brief Overview of Cable Types
So you are going to wire your network rack and are undecided on which cable to use? Selecting the correct cables for your network rack or server rack is imperative. Here’s a quick guide to assist you in making a good decision based on your needs.
The most popular cable types are:
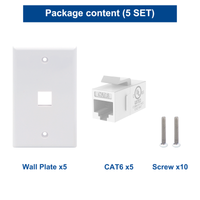
- Cat5e: Supports up to 1 Gbps, ideal for small domestic or office setups.
- Cat6: Supports a maximum of 10 Gbps, ideal for contemporary network demands for increased speeds.
- Cat6a: Also like Cat6, but has better performance at longer distances and is well-suited for data centers.
- Fiber optic: Suitable for high-speed and long-distance data transmission, usually utilized in large-scale or enterprise settings where data integrity is paramount.
Expert Tip: Avoid purchasing the lowest-priced cables and select cable types not only according to immediate needs but also according to possible future network extensions and technical updates.

Safety Considerations
With a few safety checks, both your equipment and the individuals around it can be well-protected. Safety should always be a top concern when installing any server rack:
- Prevent overloading: Don’t exceed weight or cable density thresholds on your network rack so as not to cause a structural collapse.
- Proper grounding: Ground your rack to prevent electrical risks and fires.
- Clearance and accessibility: Keep clear corridors around your network rack for easy and secure access in case of an emergency or for maintenance purposes.
Most accidents tend to occur when cables are an afterthought. It’s well worthwhile making a few safety precautions and saving from headaches tomorrow.
Concluding Thoughts
Wiring a network rack isn’t merely a technical exercise, it’s an investment in the performance of your system and your peace of mind. Properly cabling your network rack isn’t difficult, but it demands attention and planning. Adhering to these best practices guarantees a high-speed, easy-to-maintain network, expandable as your needs expand. Take the time necessary to plan carefully and execute meticulously, and perform routine maintenance checks to have a clutter-free, high-performing network environment.


Be the first one to comment.
Leave a comment