An Ethernet cable crimper is an essential tool for anyone working with Ethernet cable termination. Enhancing the efficiency and success of Ethernet cable termination starts with the essential tool-a good-quality Ethernet cable crimper. Whether you’re a professional network installer, a dedicated DIY enthusiast, or a skilled IT technician, here is the ultimate guide for you on how to use and maintain an Ethernet cable crimper.
What Does Ethernet Crimping Tool Look Like?
To maximize your proficiency with the Ethernet crimping tool, it’s vital to acquaint yourself with the construction and functionality of each part. Let’s delve into some important parts of this all-in-one RJ45 crimping tool.
You can see from the front of the RJ45 crimping tool, and it has the following features:

- Ergonomic handle: Made of the non-slip material, the handle ensures both comfort and ease of operation and it is easy to clean and operate.
- External ground crimp cavity: This cavity is designed for RJ45 connectors with external ground collars, ensuring versatility.
- Adjustable presser bar: You can adjust the presser bar for RJ45 connectors with strain latches or those without.
- Crimp cavities: The tool is equipped with two crimp cavities, one is designed for RJ45 crimping and the other is used to handle telephone connectors. This tool can cater to a wide range of networking and telecommunication requirements.
- Lock Button: Press the lock button and push in the handle, then the RJ45 crimping tool will open up automatically.
With a better understanding of these features and functions, you'll harness the full potential of your RJ45 crimping tool!
How to Use Ethernet Crimping Tool?
Crimping the RJ45 connector involves some steps. Here’s a step-by-step guide on how to use an Ethernet crimping tool.
Required Tools and Materials
- CAT6 Ethernet Cable
- RJ45 Connector
- Ethernet Crimping Tool
- Wire Stripper and Cutter
- Network Tester (Optional)
Step-by-Step Instructions
-
Cut the Ethernet cable to the desired length. Use the wire stripper to remove about 1.5 inches of the outer insulation. Ensure the copper wires are not damaged.
- Straighten eight wires and arrange them in T568A or T568B color coding. Once you opt for one color code, you should insist on it.
-
Cut wires with a 45-degree angle so that they can easily pass through the RJ45 connector. If you use a non-pass-thru RJ45 connector, you should give wires a flat cut.
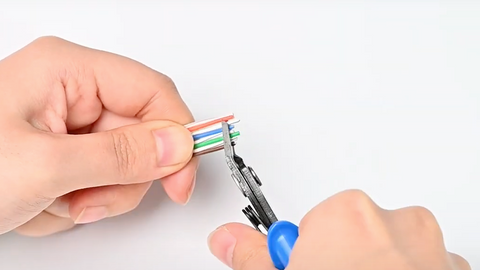
- Slide the arranged wires into the RJ45 connector and double-check that the wires maintain their color order. (If you use a standard RJ45 connector, ensure that wires reach the end of the connector.)
- Place the connector into the Ethernet crimping tool’s crimping cavity and squeeze the handle of the crimping tool to crimp the connector, making contact between wires and contact pins. A good-quality crimping tool features an excellent ratcheting mechanism.
- If you need to make a patch cable, repeat the above steps to crimp another connector on the other end of the cable. Use the network tester to check if the patch cable can work well.
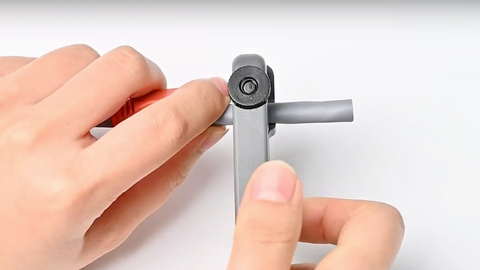
Do you know the function of the presser bar? Don’t be confused by the “CAT5” and “CAT7” printed on the crimping tool. This presser bar is designed to crimp RJ45 connectors with or without strain latch. Move the screw to “CAT5” mode to raise the bar, and you can crimp those RJ45 connectors with strain latches; move the screw to “CAT7” mode to lower the bar, and this mode is suitable for RJ45 connectors without strain latches.

In case you don't know what stain latch is, refer to the following picture.

How to Crimp an External Ground Collar?
Some shielded RJ45 connectors feature external ground collars, and you can use the RJ45 crimping tool to crimp it. Here is a small tip on effectively crimping the outer ground collar.
- Slightly bend the cable and use the tool at your hand to press the tab down.
- Put the cable jacket with the external ground collar on the cavity and tightly press the handle. Then, you’ll get a perfect crimp.
How to Replace Blade for an Ethernet Crimping Tool?
An Ethernet crimping tool has a long service life and you can use it for several years, but the blade can be dull with heavy use. Don’t worry; the cutting blade of our Ethernet crimping tool is replaceable.
Firstly, lock the crimping tool and use the screwdriver to unfasten the screw.
Then, remove the screw. Open the handle of the crimping tool and lower the presser bar. Use the small, rigid tool to tap the blade. Be careful not to contact the termination teeth because they are easily damaged.
As the blade and screw are removed, it’s time to place the new blade on the roll pin. The new blade can be very sharp, and be careful not to hurt yourself.
Last but not least, please carefully dispose of the old blade. Though it is dull, it can still be sharp to hurt yourself and other people.
Final Thoughts
Our versatile Ethernet crimping tool can be used to terminate a wide range of RJ45 connectors, such as shielded CAT6 connectors, RJ45 connectors with strain latches, CAT7 connectors with external ground collars, pass-through or non-pass-thru RJ45 connectors. Treat yourself to this all-in-one crimping tool, and you’ll benefit from it in network installation!
For more information on this topic, you can keep up on our blogs. While VCELINK offers general and basic information for our customers and other visitors to the website, it’s not professional advice.


Turned around