In this article, we will help you know how to select and install a brush wall plate or wall jack so that you can easily DIY and keep your home neat all the time.
Many families will choose wall plates according to their house style. This way, I would define a wall plate as an 'effective decoration' in room designs. Our brand is committed to creating a minimal style that is originally from Japanese danshari and IKEA. Buddhists also believe in no threads, no worries. That's why I am sure our products will be the best choice for 'minimal-living lifestyle' fans.

What is a brush wall plate for?
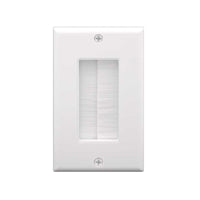
Wall plates, also known as Wall Jacks, organize cables cleanly and neatly through the drywall. It looks simple, but serves the essential function of keeping the wires out of sight. There are more than ten types of wall plates around markets, but two of them are most popular in our daily life, keystone wall plates and brush wall plates. They are easy to install and perfect for protecting low voltage cables.

Brush Wall Plate & Keystone Wall Plate
Wall plate is available in countries and regions such as the UK, U.S., Columbia, Africa, Western Europe, and Mid East.
A brush wall plate is often used to screw through cables, while a keystone wall plate is for a jack. When consumers select a wall plate, they should make it clear what is used to decide which one to purchase.

What is Wall Plate Mounting Bracket?
The wall mounting bracket is indispensable for the products.
It can be installed on the drywall directly, serving as the substrate to support the wall plate. On the other hand, its most important function is to protect the cables from any potential abrasion.
Specifically, the bracket could hold the cables steadily and fix them inside the wall, completely insulating their fragile parts from the outside environment.
How to install Wall Jack? (7 steps)
Step1: Trace inside the bracket
Step2: Place a ruler in position and use a straight edge to ensure that the mounting bracket is level.
Step3: Dig a hole in the wall. ( Make sure its size suit your bracket well)
Step4: Put the bracket in the hole and tighten it with a screwdriver
Step5: Run the cables cleanly and neatly through the brush wall plate
Step6: Tighten the screws. If not, It will cause friction between the wall and the bracket, and shorten its service life.
Step7: Add a wall jack or entry device onto the bracket.


Be the first one to comment.
Leave a comment